Adding Custom fields to your automated Journal Transactions
Created by Damien Zwillinger, Modified on Thu, 8 Aug, 2024 at 11:41 AM by Harry Lewis
Applies to:
- Velixo Classic
- Acumatica, MYOB Acumatica, Cegid XRP Flex
Acumatica, MYOB Acumatica, and CEGID allow users with a Customizer role in the system to add custom field to any screen. If you have custom transaction fields in your Journal Transactions screen, you can use Journal Writeback to populate those fields.

An example of a custom transaction field on the Journal Transactions screen
To populate custom transaction fields using Journal Writeback, follow the steps below.
Step 1
First, unless you already know it, you need to look up the internal name of the custom field, which is required to able to send it to the ERP from Velixo.
To do so, on the Journal Transactions screen, select Customization -> Inspect Element, and then click the grid column header. The internal field name will be located in the "Data Field" row of the resulting pop-up window:

Looking up the internal name of the custom field using the Customization menu
Note: If the Customization functionality isn't visible, ask your ERP administrator (or anyone who has the Customizer role) to perform the above step for you and provide you with the internal field name.
Step 2
Back in Velixo, on the Journal Transaction template worksheet, locate the row containing the transaction column names, and add a new column with a name exactly matching the internal name of your custom field in Acumatica:
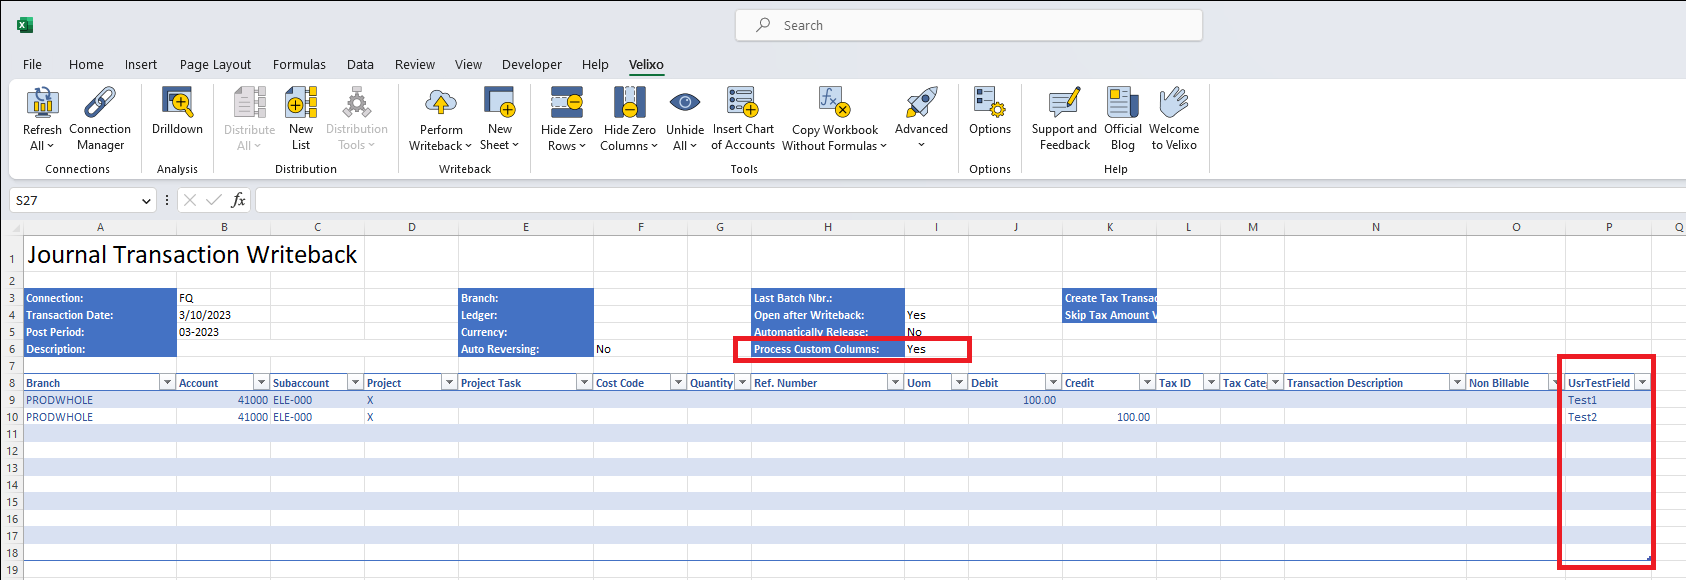
Adding a custom column to the Journal Writeback template
Step 3
Next, make sure that in the template header, the Include Custom Columns option (or Process Custom Columns in older versions) is set to Yes (see the screenshot above).
Step 4
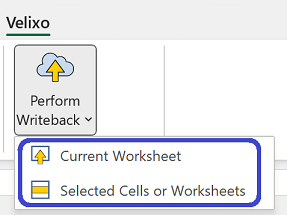
Finally, fill out the transaction template and click Perform Writeback -> Current Worksheet.
The custom transaction field in Acumatica will be populated with the values that you specified in the respective template column:

The resulting Acumatica batch with the custom field populated by the Journal Writeback feature
⚠ Note: There is no pre-validation for importing data from custom fields. Make sure that all data you enter for a custom field is correct.
Writing to Other Non-Custom Columns
Besides custom fields, Journal Writeback supports populating any other writable transaction field that is not present among the default Journal Transaction template columns.
For example, if your ERP instance is customized so that Customer/Vendor or InventoryID column is writeable (they are read-only by default), you can use Journal Writeback to populate those. For more information on customizing your ERP, please contact your partner or implementation consultant.
We have created a Customization Project to help with the process. Your partner or consultant can install and publish this within the ERP to customize your ERP instance so that the Customer/Vendor column is writeable.

Download the Customization Project
Was this article helpful?
That’s Great!
Thank you for your feedback
Sorry! We couldn't be helpful
Thank you for your feedback
Feedback sent
We appreciate your effort and will try to fix the article