Creating custom Drilldowns
Created by Damien Zwillinger, Modified on Thu, 5 Oct, 2023 at 5:50 PM by Gabriel Michaud
Applies to:
- Velixo NX (on Excel desktop only)
- Velixo Classic
- Acumatica, Cegid, MYOB
Note: Custom Drilldowns relies on Exce's Visual Basic macros, therefore this article only applies to Velixo Classic and also Velixo NX but only Excel on Desktop is used. VB Macros are not supported by Excel Online
TABLE OF CONTENTS
Overview
Velixo Classic includes a Drilldown feature which provides the ability to obtain more detailed data about GL balances that are included in our reports.
To access this, we can select a value in our report, and then click Drilldown on the Velixo ribbon.

The created worksheet displays all the summary data which is used to calculate that original balance.

If we want even more detailed information, we can click on the View Transactions link for any of the summary items.

This takes use directly to the Account Details screen in our ERP, where we see all the underlying data for that value:

And from there we can even view the individual transactions on a batch-by-batch basis.
This is a great feature. There are times, however, when it might be convenient to view the full list of transactions at one time – and to do so within Excel.
Let’s explore how we can do that.
View the Video
Watch as we go work through the process of creating a report that does this:
If you prefer to read about how we created this report, continue with our step-by-step directions.
Step by Step
Let's assume we have a report to which we want to add the ability to show underlying transactions:

Step 1 - Generic Inquiry
First, we’re going to need the Velixo-GLDetail Generic Inquiry that has been created to retrieve transactional data from the ERP.
Here you can see that we have imported the “Velixo-GLDetail” inquiry into our ERP:
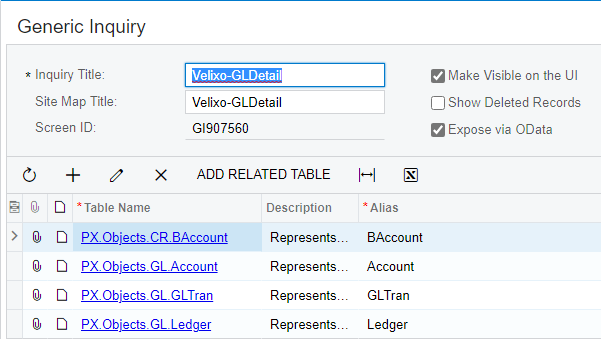
(we’ll need to remember that name for later)
This inquiry retrieves the data for every transaction in our general ledger module. Obviously, we don’t want to bring all our GL transactions in an Excel report!
Rather, what we will want to do is set up a worksheet in our workbook which will allow us to display a specific subset of the data from that inquiry.
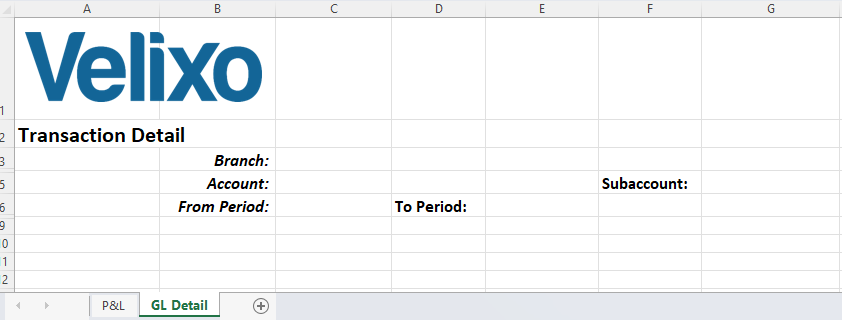
Step 2 - Create our "Details" worksheet
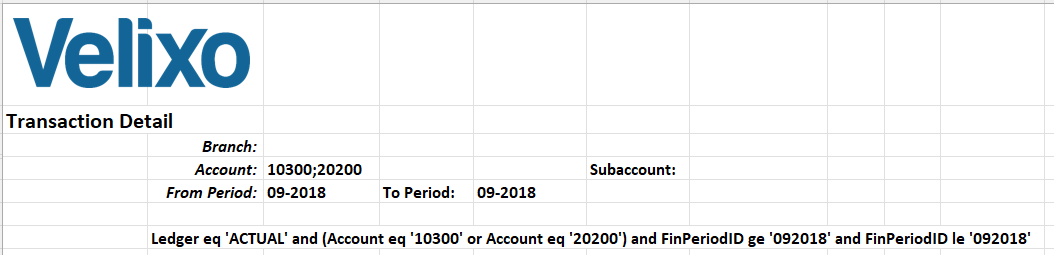
You can see here that we have created a worksheet that allows us to specify one or more branches, accounts, subaccounts, and a range of financial periods for the transactions we want to see:
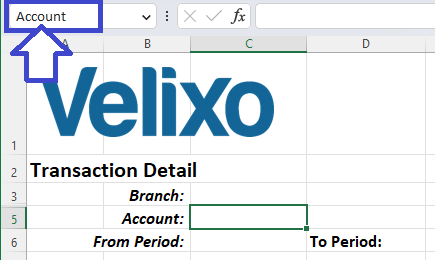
We've even assigned names to the various cells to make it easier for us to reference them later:
Let’s put in some sample information and configure a filter that we can use to get data form our generic inquiry (for now, we won’t bother with a subaccount, so that we can see all transactions for the accounts we entered):

Step 3 - Create a Filter
Now, let’s use the Velixo GIFILTER function to define the filter we will use for retrieving the data.
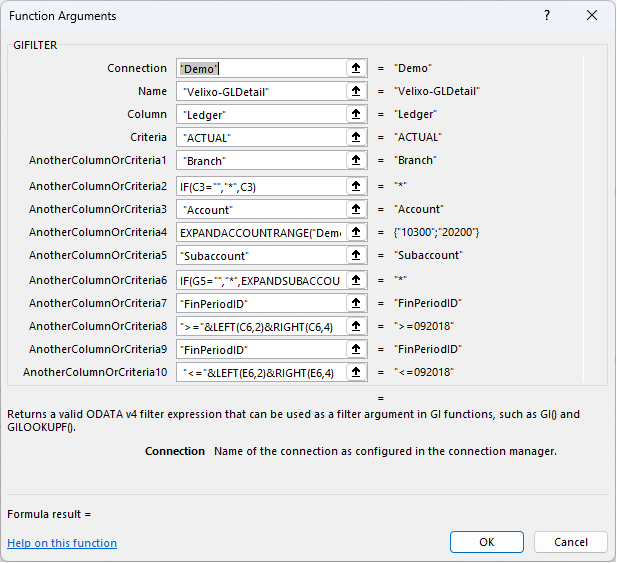
In addition to the name of our Connection and the name of the generic inquiry (this is why it was important that we remember that name), we've included filters for the Ledger, Branch, Account, Subaccount, and range of Financial Periods. You can refer to the documentation for the GIFILTER function for more information about each of the parameters.
Now it’s time to pass our filter to the generic inquiry and get back the desired data. Let’s start by adding a header which includes easily readable names.

Step 4 - Bring the filtered Generic Inquiry data into Excel
Now, we’ll use the Velixo GI() function to get our data.
The GI function includes just 5 parameters:
The name of our connection
The name of the generic inquiry
The filter we want to use to define the data we want to retrieve
The fields we want to display
and whether or not we want to display the field names that come from the database
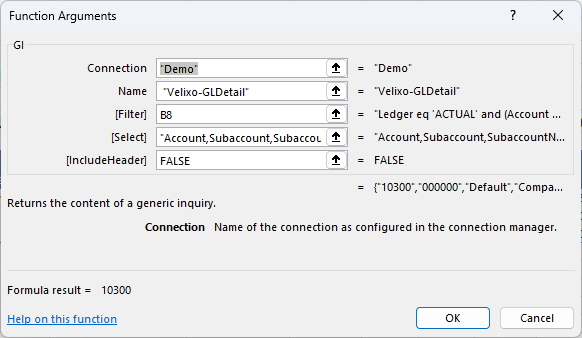
For the Filter, you can see that we entered reference to the GIFILTER function we just created in cell B8
For the fields we want to display (the Select parameter), we simply entered a list of the fields (separated by commas) that match the header we created earlier.
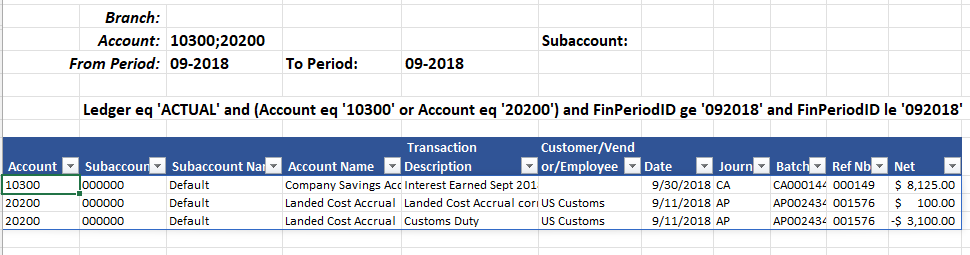
Once we click OK, the data for the transactions we have asked for is displayed:
You can refer to the documentation for the GI function for additional details on using that function.
Step 5 - Show transactional data from our report
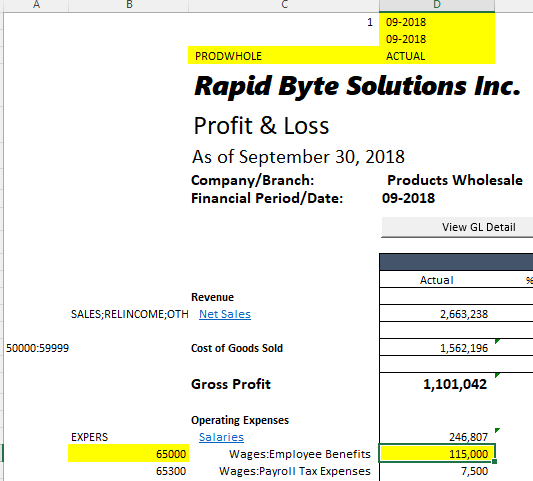
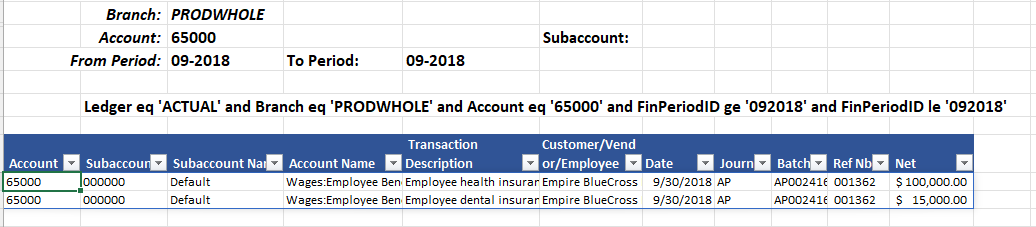
Let’s go back and look at our report, again.
Let’s suppose that we want to see the transactional data for this 115,000 value.

If we expand the behind-the-scenes areas, we see the highlighted branch, account, and period information used to retrieve this value.
Let’s just manually plug that information into our newly created GL Detail sheet.
Once we put in the same branch, account number, and financial periods, we see the underlying data on which that 115,000 value is based:
Step 6 - Automate the process with a Macro
What we want to do, now, is create the ability to do this without having to manually type the information on this sheet. So, our next step is to create a simple Excel macro which will copy the necessary information from our report to our GL Detail sheet.
Here in Excel's Visual Basic editor is a macro that does that:
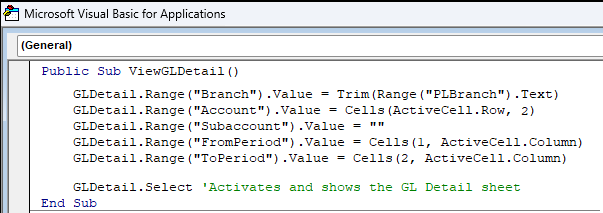
The macro takes the information from our report (based on the specific line and column of the value we select - "ActiveCell.Row" and "ActiveCell.Column") and places it in the appropriate cells in our GL Detail sheet. You can see that the macro uses the names we assigned to those cells (Branch, Account, Subaccount, etc.). The last line of the macro then displays our new GLDetail sheet.
Now that we have our macro, let’s make it easy to access. Going back to our report, we’ve placed a View GL Detail button on the worksheet:

It's a simple task to assign our macro to this button (we just right click on the button, select Assign Macro, choose our new macro from the list, and click OK)

Now, we can select a value in our report...
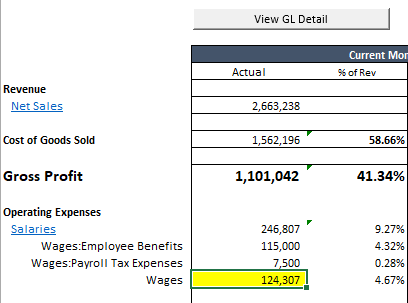
...click the View GL Detail button, and we’re automatically taken to our GL Detail worksheet where the correct values have been placed in the parameter cells and the transaction data has been retrieved from the generic inquiry:
Was this article helpful?
That’s Great!
Thank you for your feedback
Sorry! We couldn't be helpful
Thank you for your feedback
Feedback sent
We appreciate your effort and will try to fix the article